Using Flow Diagrams to Manage State in Complex Applications
Day 16 of National Blog Posting Month #NaBloPoMo
A few days ago I blogged about managing state in Vue apps with Vuex modules. I’m currently grappling with some fairly complex state management in a Vue app, and I wanted to share a bit about my process and how I’ve made it more manageable.
Background
I work on a web app for wind turbine operators to visualise data, plan maintenance and optimise the output of their turbines. It includes an area where operators can select turbines and compare data from various sensors across a selected date range, rendering different types of interactive visualisations. The app makes several different API calls to fetch data when the user updates their selection, and the page URL needs to update when different options are selected so that it can be shared.
This part of the app had already undergone several iterations, and was originally much simpler. Over time, new functionality had been bolted on. There was definitely some redundancy, and the code was becoming bloated and hard to understand. Therefore a big refactor was long overdue.
Planning state management in Miro
At this point, jumping straight into the code would be likely to lead me into an increasingly tangled mess of spaghetti. A better choice was to take a step back and look at the steps that need to be considered at each point in the user journey to make sure that could be reflected in the code.
I’m a visual person, and I’ve found the best way to break down complex coding tasks it with flow diagrams. Miro is a useful tool for whiteboarding and collaborative work, which also has some great features for drawing flow diagrams. It also has a free tier. Of course, you can use whatever tool suits you!
Mapping the user journey
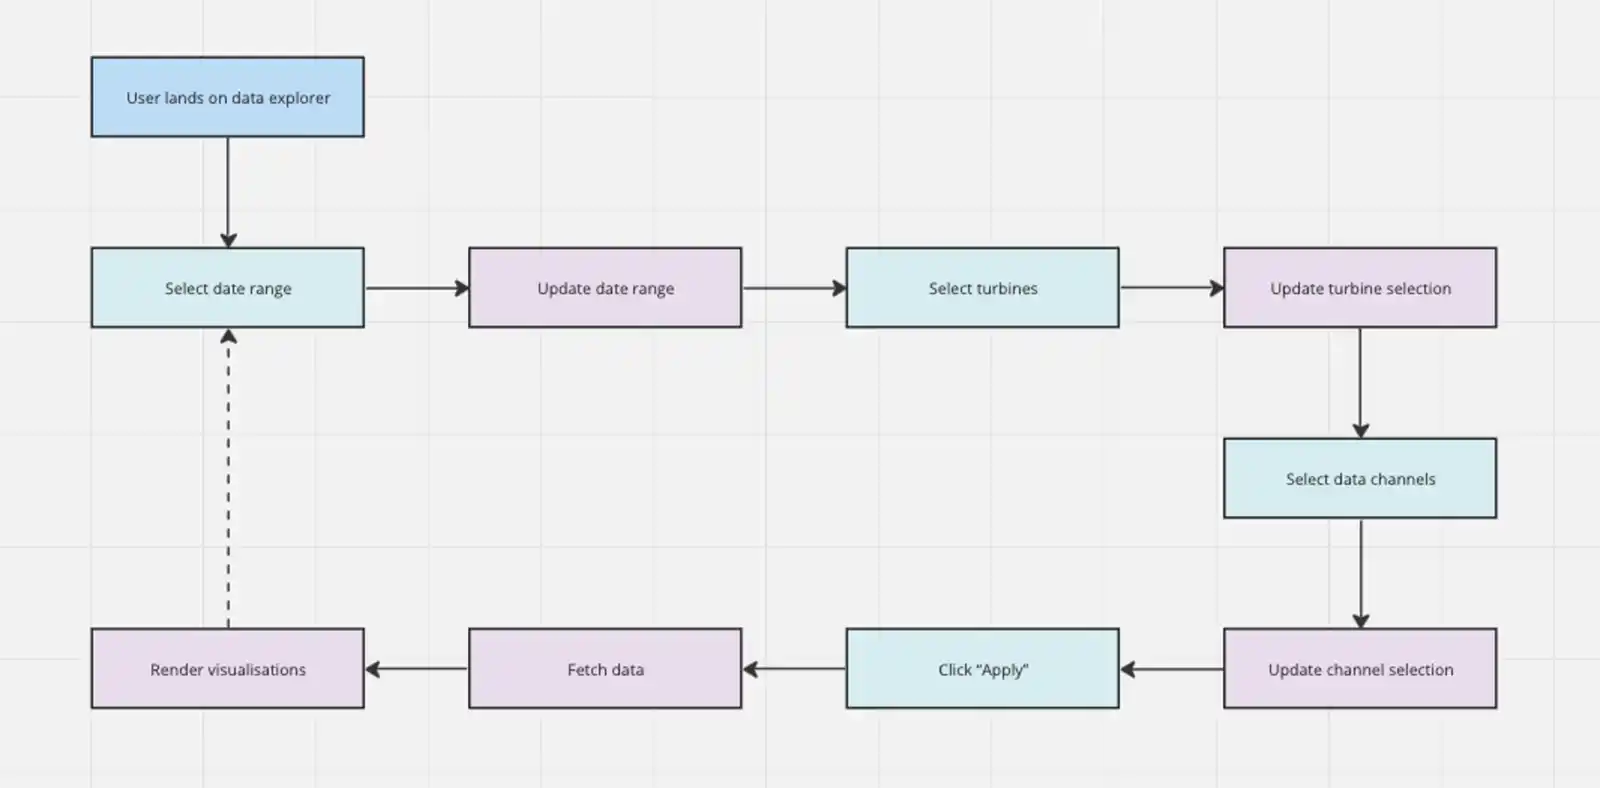
To get started, we could map out the user journey for someone landing on the data explorer page, updating some filters and clicking “Apply”, which triggers the API request.

This is already a good start. We can already begin to comprehend some of the functions we’ll need to write at each step. We could even begin to write them out in our state management library. This is an example of how we might write some actions in Vuex:
const actions = {
  updateDateRange: ({ state }, value) => {},
  updateTurbineSelection: ({ state }, value) => {},
  updateChannelSelection: ({ state }, value) => {},
  fetchData: ({ state }) => {},
  updateVisualisations: ({ state }) => {},
}
In the flow diagram I’m using different colours for actions performed by the user (in pale blue here) and those initiated by the app in response (light purple). For example, the user clicks apply, but fetching the data is done by the app. In fact, and action is performed by the app in response to each user action. We could draw the flow diagram in a way that makes this much clearer.
This is still overly simplistic. In reality there are many more steps we can (and should) consider. What happens if the user misses a step in the filter selection process and tries to click “Apply”? We’d probably want to prevent the API request until they’ve selected all the required options. Should we display a warning message? Disable the button until all options are selected? What happens if our API request fails? Should we inform the user?
We can start to flesh out the flow diagram further still. Now we can see some of the getter functions that we might need in our state management library.

const getters = {
  shouldEnableApply: (state) => {},
  getVisualisations: (state) => {},
  getError: (state) => {},
}
Planning our application state
Once we’ve comprehensively plotted out the user journey, we can start translating this into how our application state will be structured. Below each of the steps we can add a text box showing the current state at each point. I like to highlight the newly updated parts, to clearly differentiate them.
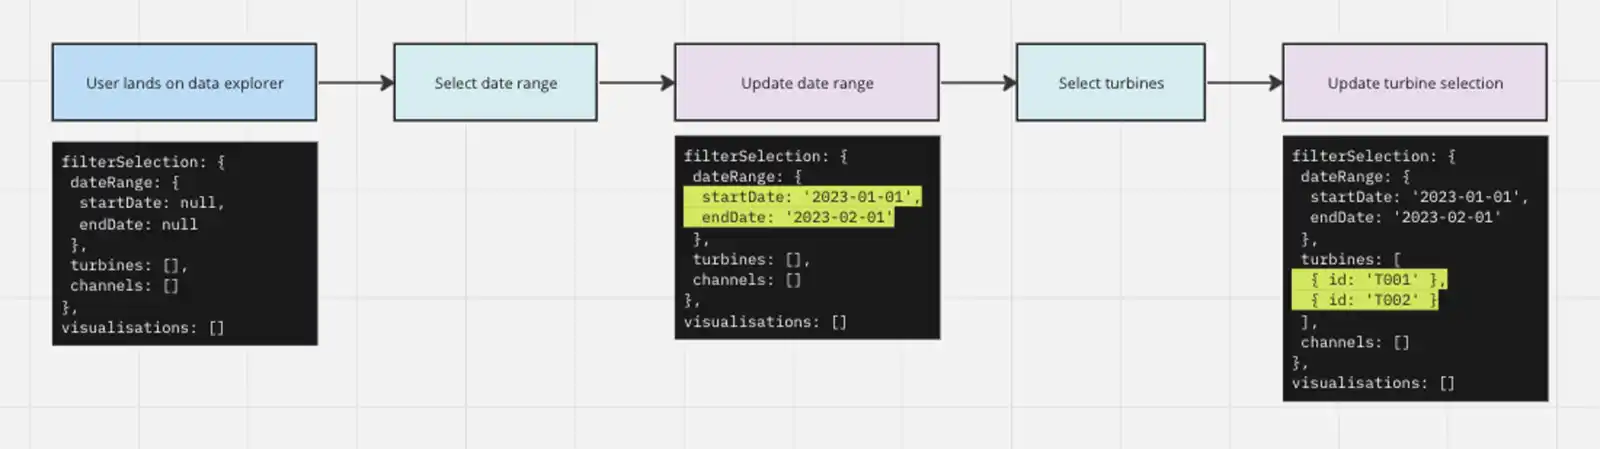
This helps us discern which parts of the state will need to be updated, and where we can reuse functions.
Actions, getters and mutations
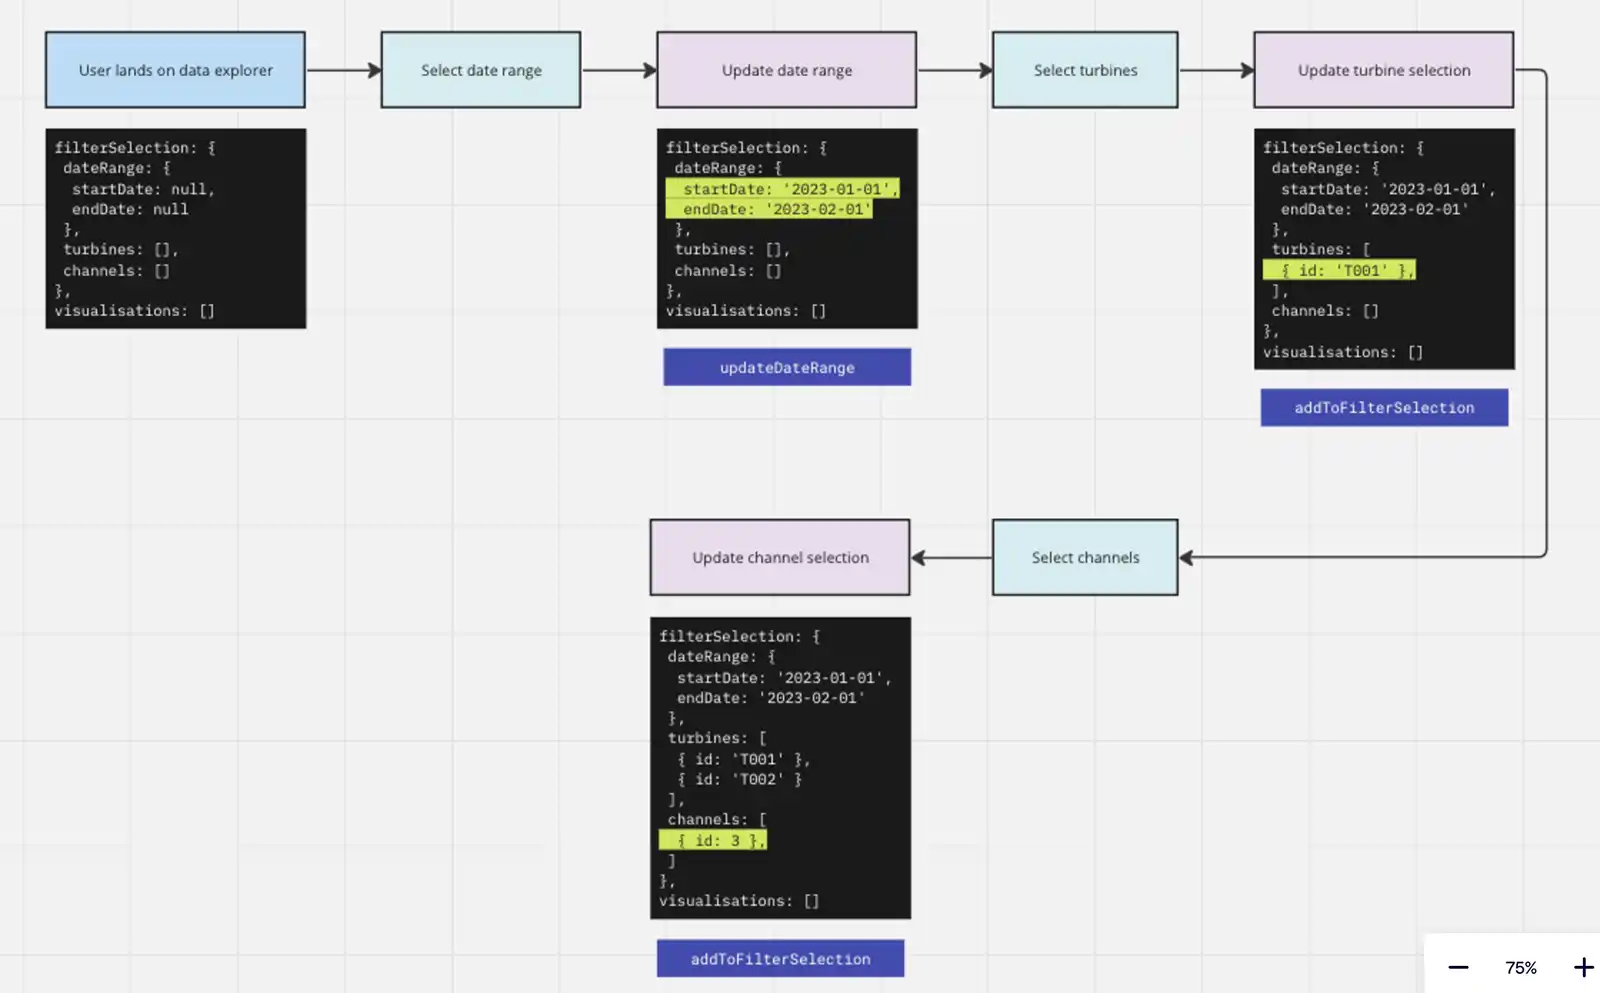
Now we can think seriously about the functions we need to write to update the state and retrieve the computed values for use in our front end. By looking at the similarities we can see ways to avoid repetition and write code that’s more efficient.
Here we can see that the turbines and channels are updated in similar ways. Perhaps we just need one mutation to cover both cases. I’ll add these as labels below our state text boxes.
Sometimes multiple things need to happen following a user’s interaction. For instance, if a user clicks a turbine to deselect it, we should remove it from the selection. We might want to group some mutations into actions.
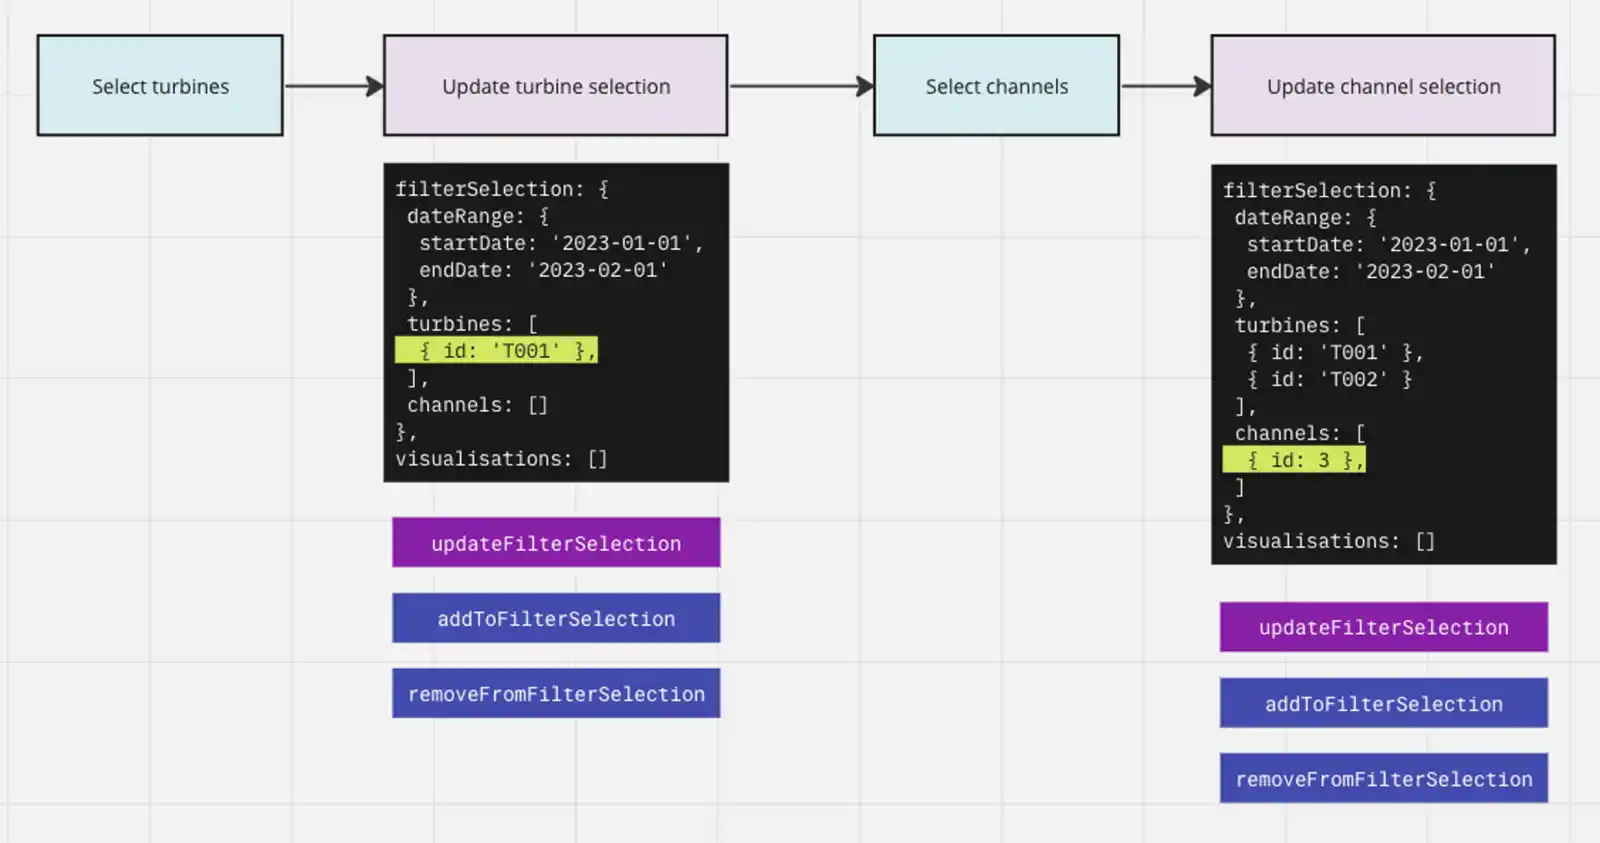
Here’s how we might write that in our JS code:
const mutations = {
  addToFilterSelection: (state, { key, value }) => {},
  removeFromFilterSelection: (state, { key, value }) => {},
}
const actions = {
updateFilterSelection: ({ state, getters, commit }, { key, value }) => {
const { selectionIncludesOption } = getters
if (selectionIncludesOption({ key, value })) {
commit('removeFromFilterSelection', { key, value })
} else {
commit('addToFilterSelection', { key, value })
}
},
}Summary
Although we’ve vastly simplified the example, hopefully you can see how (if you’re a visual person) using tools like Miro to map out application state could help us write better code. It can also help when it comes to testing, ensuring we have full coverage. Let me know if you have any tips!
Webmentions for this page
About webmentionsLikes: 0
Reposts: 0
Mentions: 2